localhost:3001. If you're running Genten via Docker,
confirm the container is up with docker compose up -d and
open http://localhost:3001 in your browser.
Install n8n
You need n8n running on your machine to connect it to Genten. Choose your installation method:
Not sure which to choose?
• You have Node.js 18–24 installed
• You want the simplest
setup (1 command)
• You don't use Docker
• You have Node.js 25+ or don't know your version
• You
want guaranteed compatibility
• You already use Docker
Step 1: Check your Node version
node --version
n8n requires Node 18–24. If you see v25 or higher,
use Docker instead.
Step 2: Run n8n
npx n8n
Wait for:
"Editor is now accessible via:
                      http://localhost:5678"
First run downloads n8n (~1–2 min). Leave this terminal open.
Open http://localhost:5678 and create a local
account
npm install -g n8n. Then run with
n8n start.
Step 1: Install Docker Desktop
Download from docker.com/products/docker-desktop, install, and open the app. Wait until the menu bar icon shows "Docker Desktop is running."
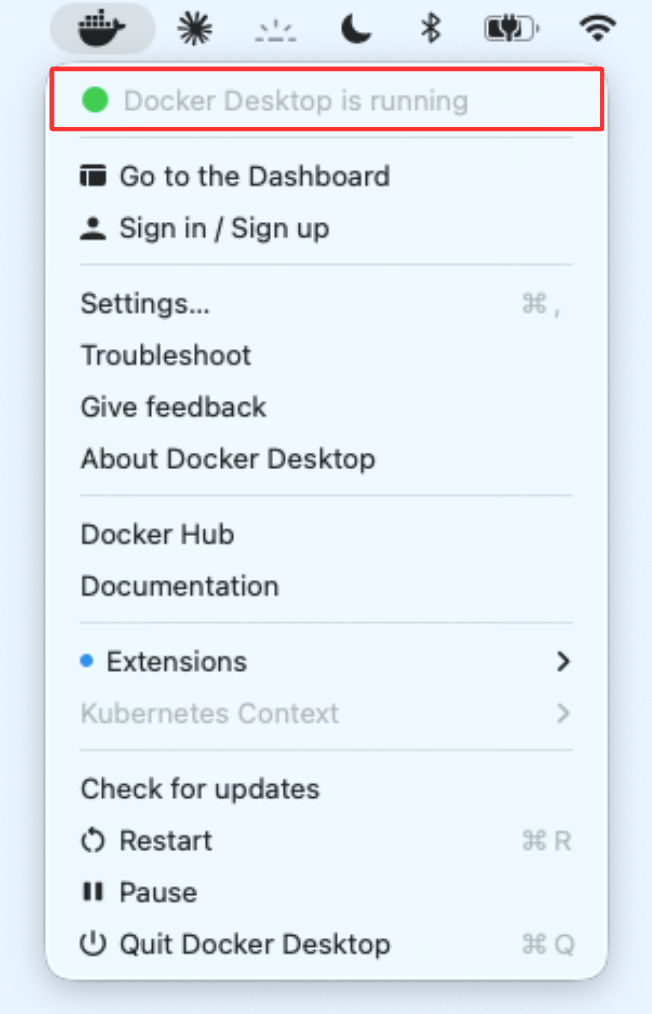
✓ Docker is ready when you see "Docker Desktop is running"
Step 2: Run n8n in Docker
docker run -it --rm --name n8n -p 5678:5678 n8nio/n8n
Wait for:
"Editor is now accessible via:
                      http://localhost:5678"
First run downloads the n8n image (~1GB). Leave this terminal open.
Open http://localhost:5678 and create a local
account
Register your agent in Genten
In Genten, go to Connect Agent, select n8n, give your agent a name, and click Register My Agent.
Select npx/npm as your installation method to see your connection credentials. Keep this wizard open — you'll use these credentials in Step 4.
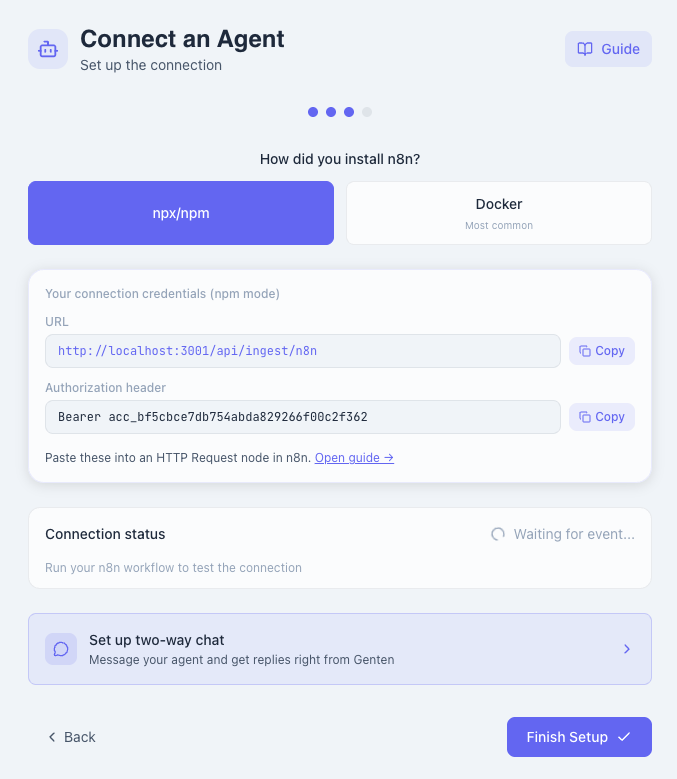
Your connection credentials for npx installation
Select Docker as your installation method. Genten
will show host.docker.internal instead of
localhost in your credentials — this is required for
n8n to reach Genten from inside Docker.

Your connection credentials for Docker installation
host.docker.internal instead of
localhost. This ensures n8n can reach Genten from
inside the container.
Create a workflow in n8n
Open n8n at http://localhost:5678 and create your first
workflow.
Click Create your first workflow
Or click the + button in the top right if you already
have workflows
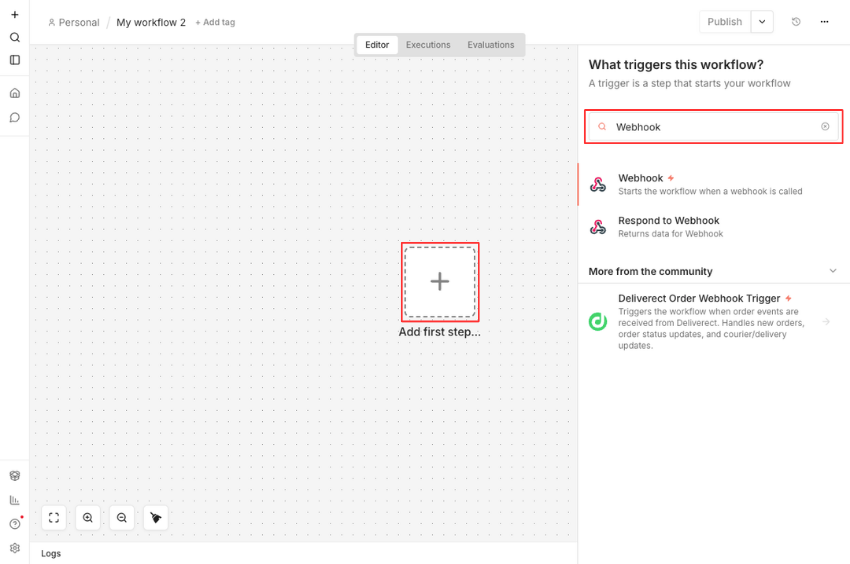
Add a Manual Trigger node
Click the center + → search "Manual Trigger" → select
it. This lets you test by clicking a button instead of waiting for
a real event.
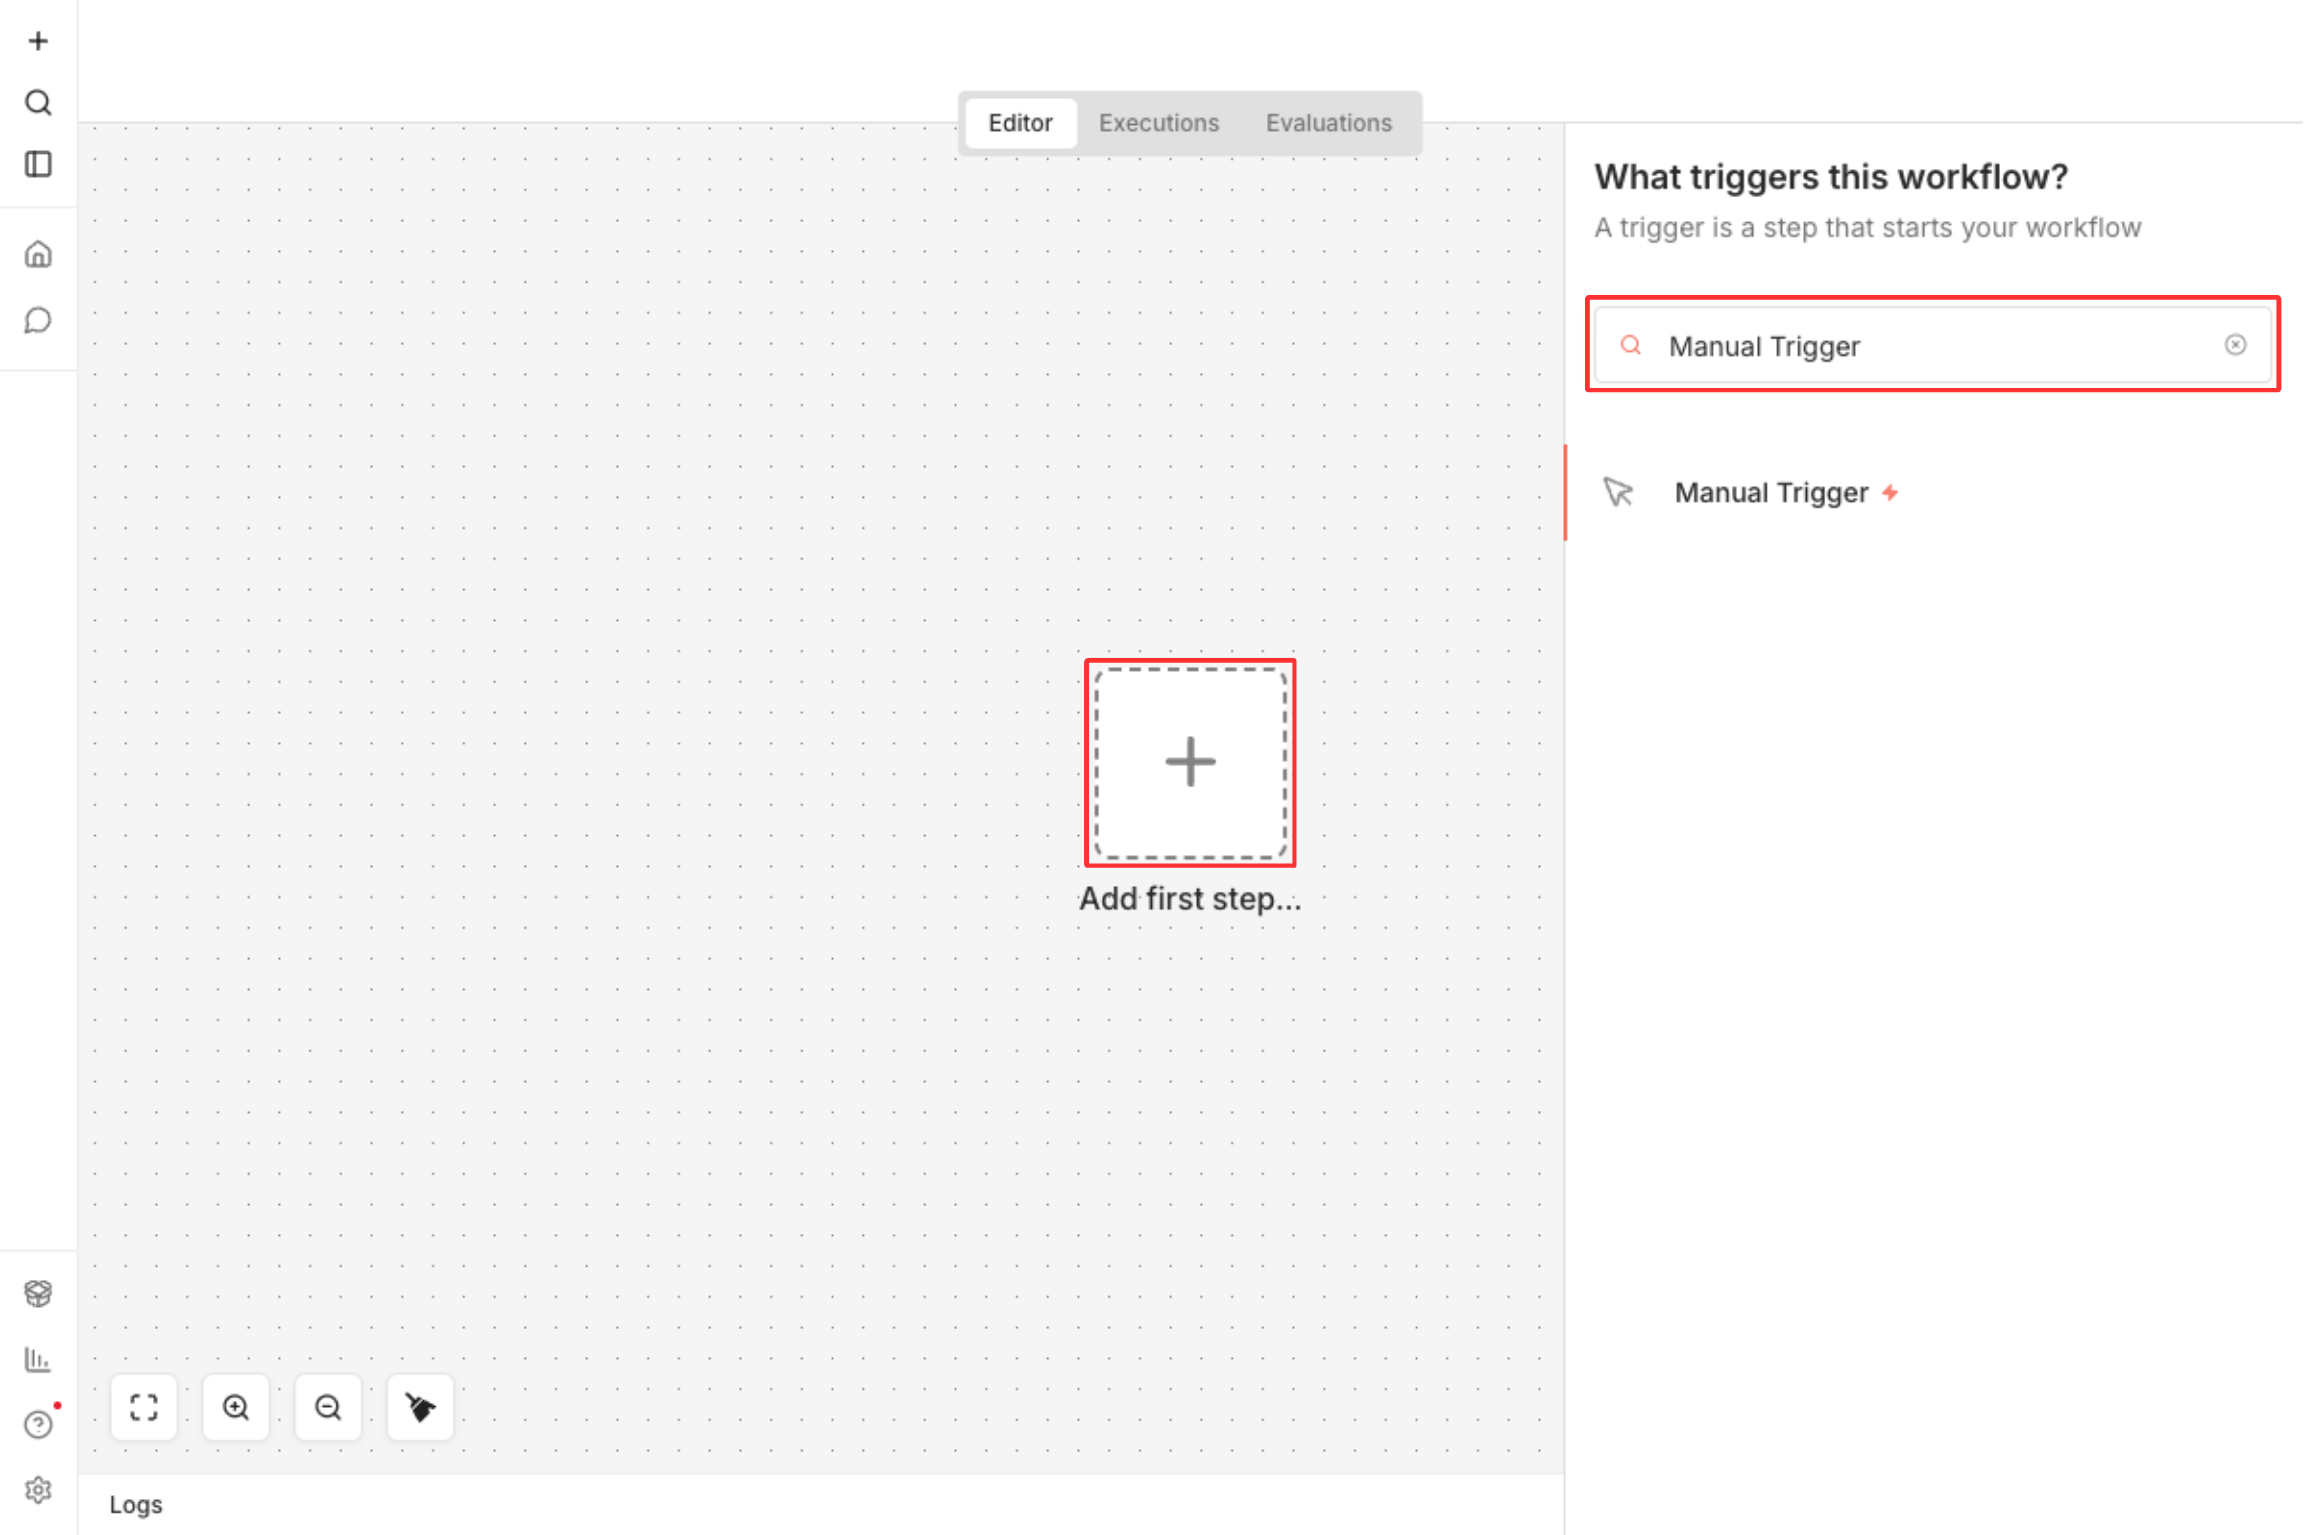
Click the center + button, then search for "Manual Trigger"
Add an HTTP Request node
Click + to the right of the Manual Trigger node →
search "HTTP Request" → select it. This node sends data to Genten.
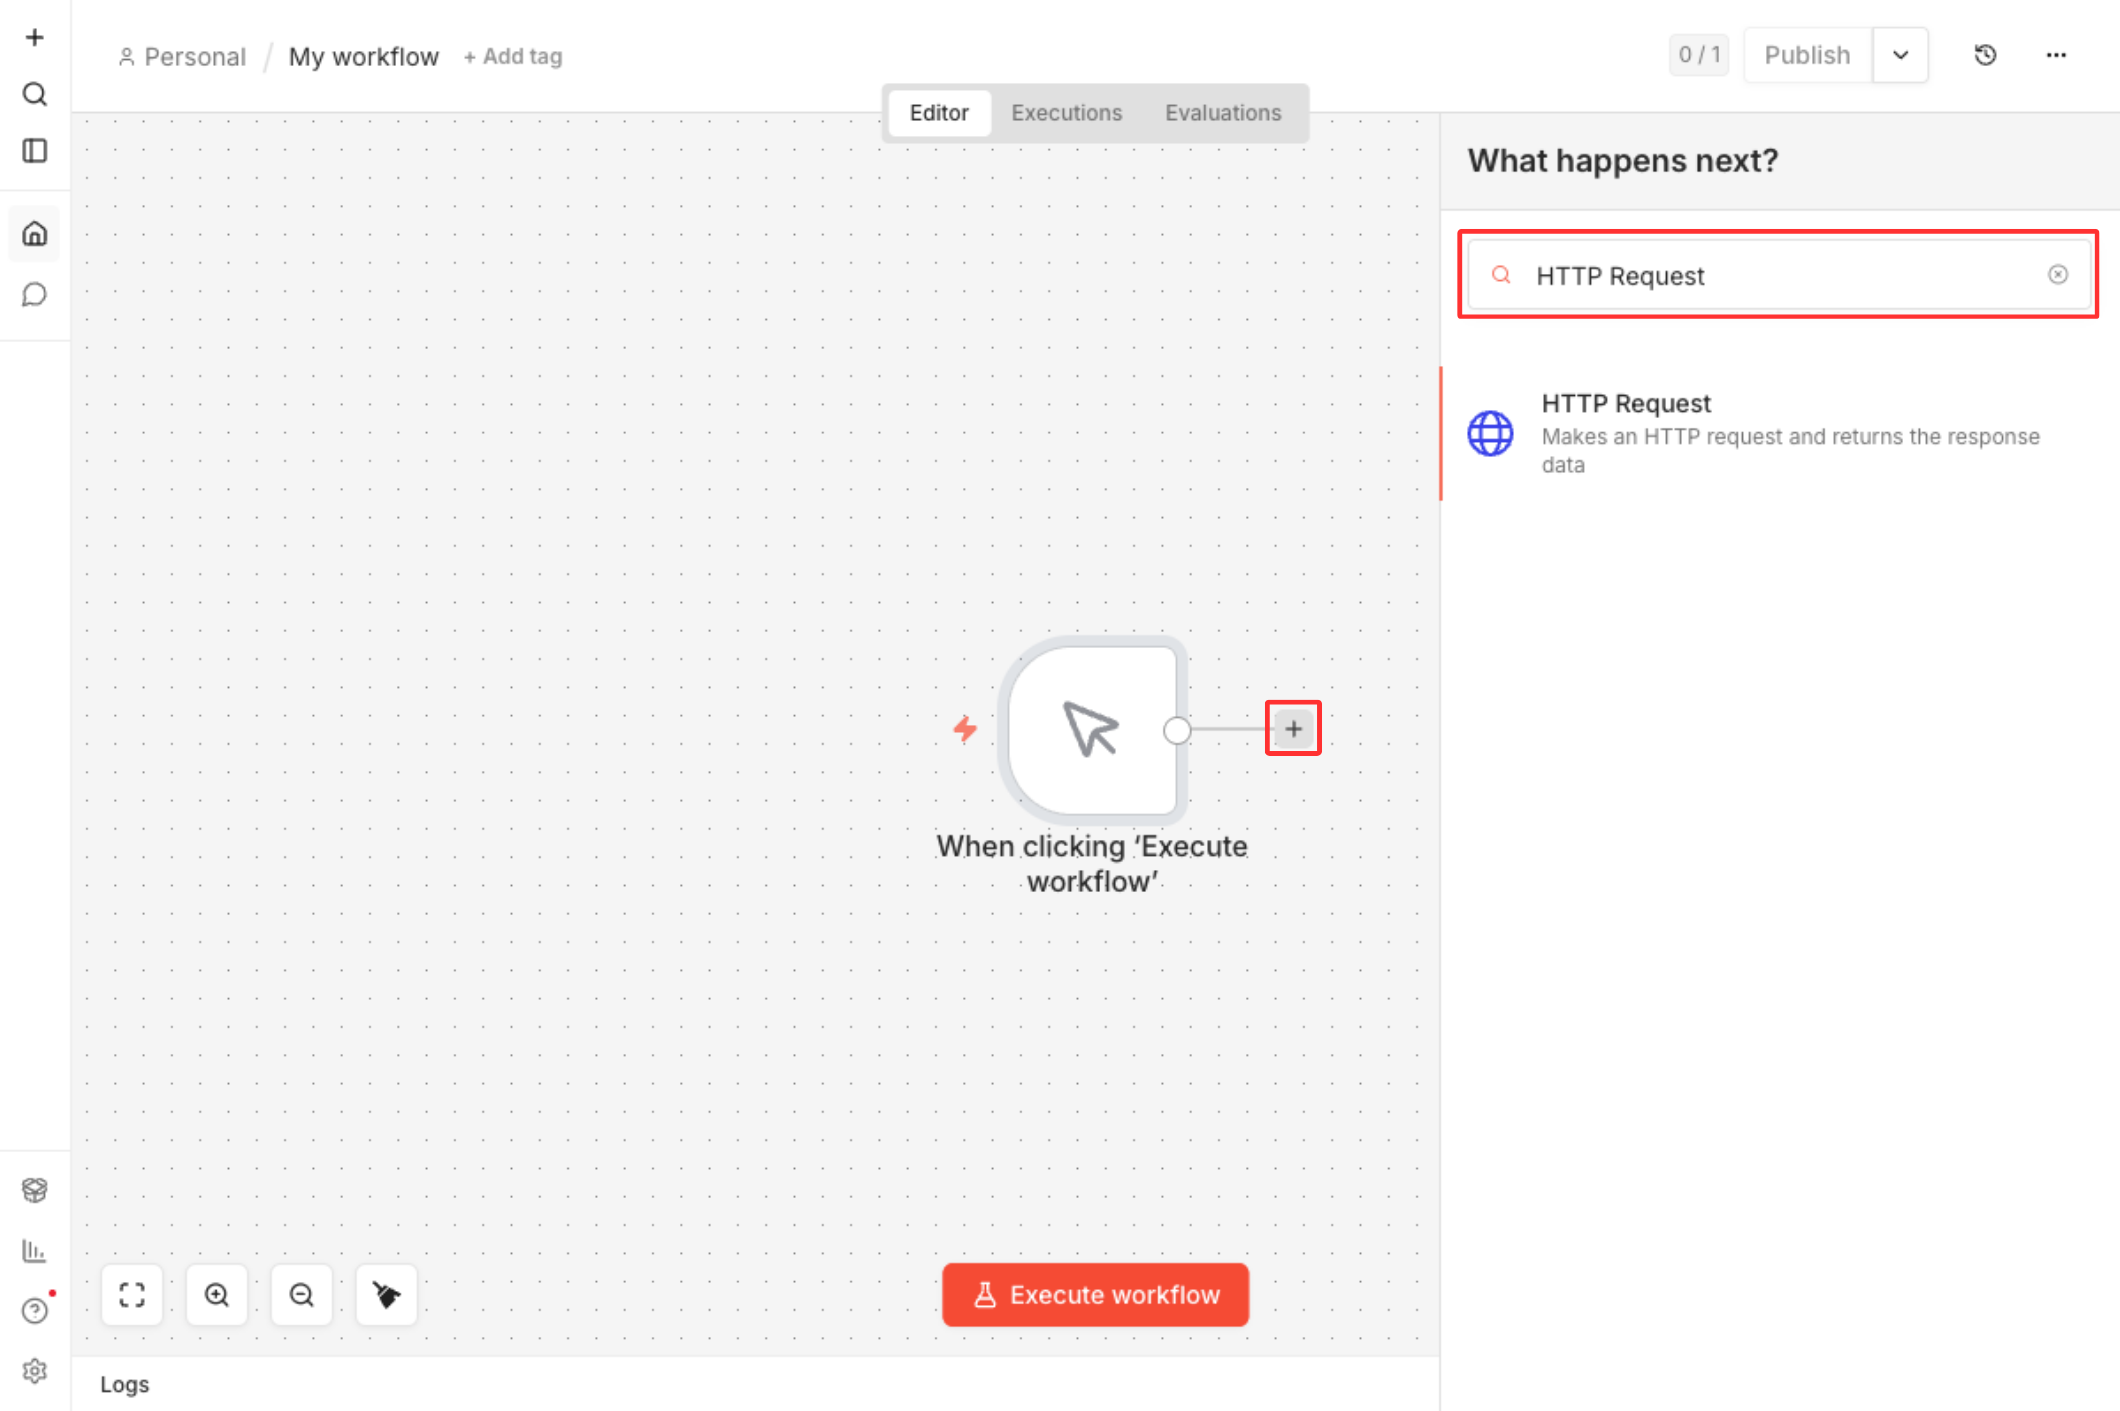
Search for and select "HTTP Request" to add it to your workflow
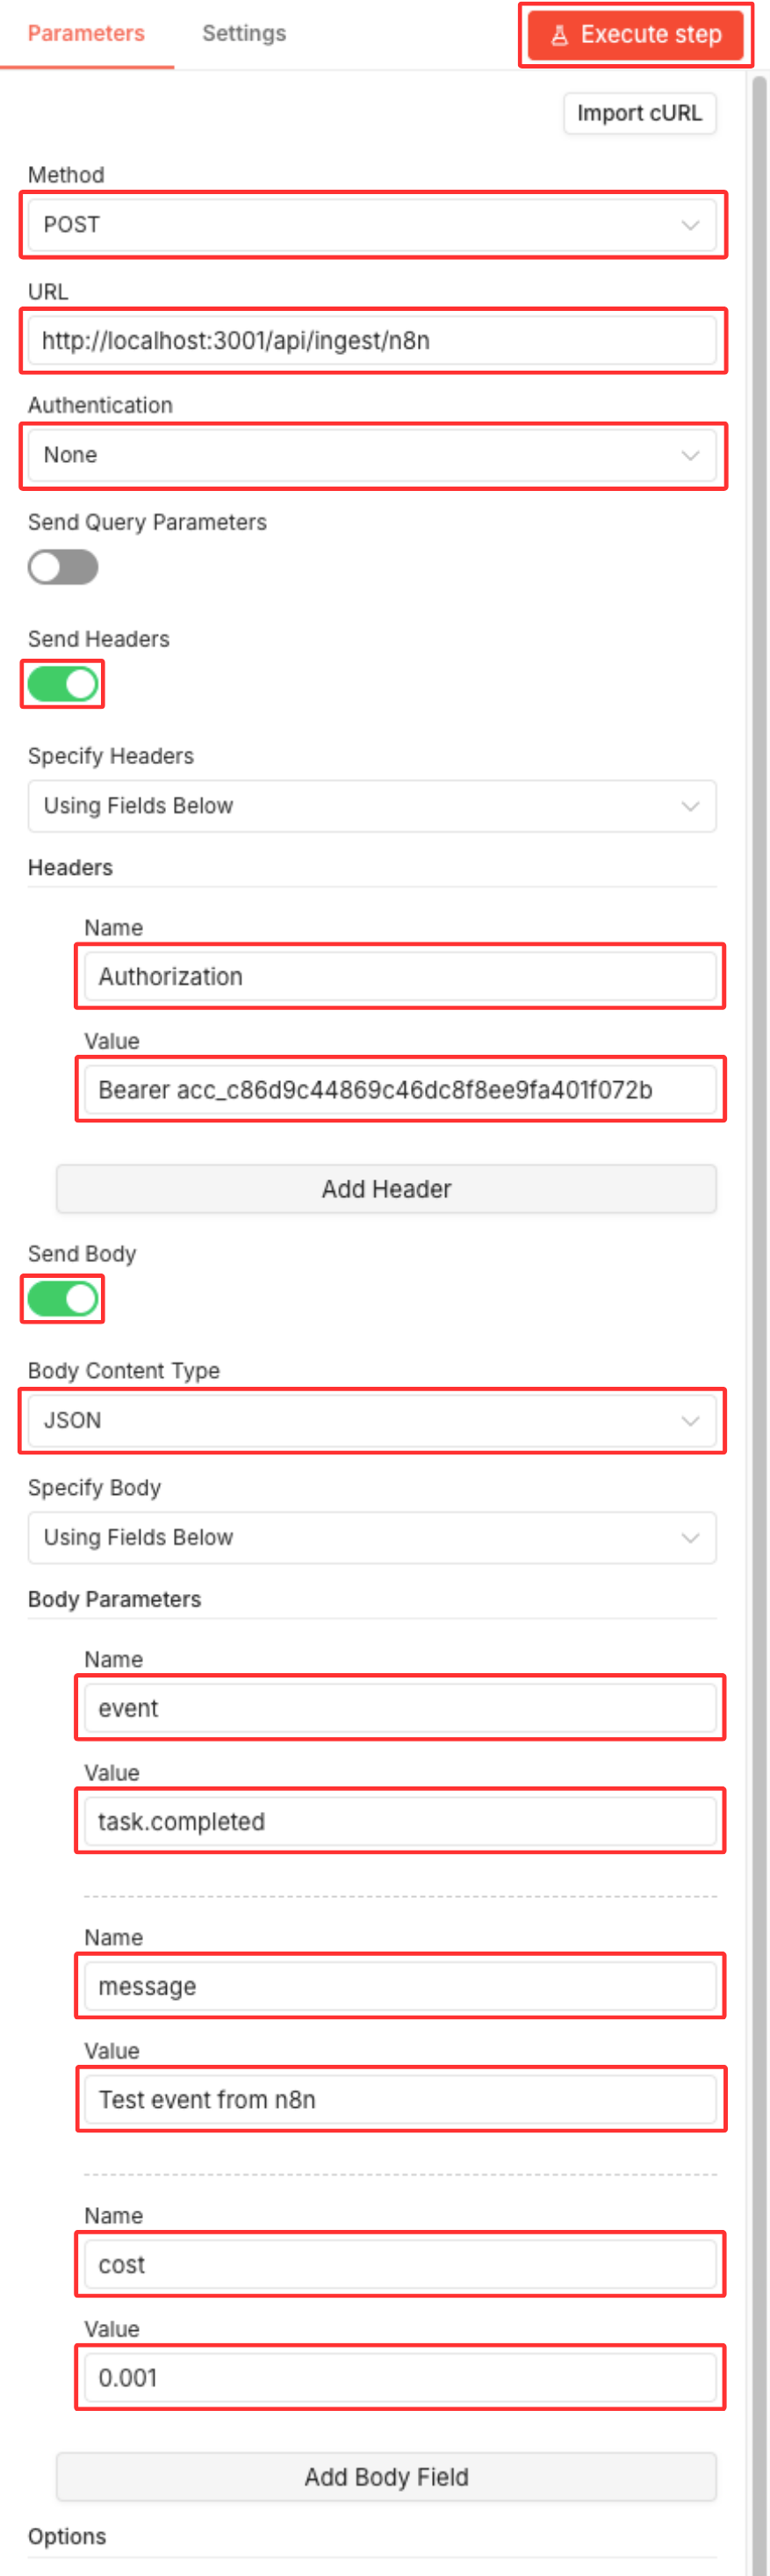
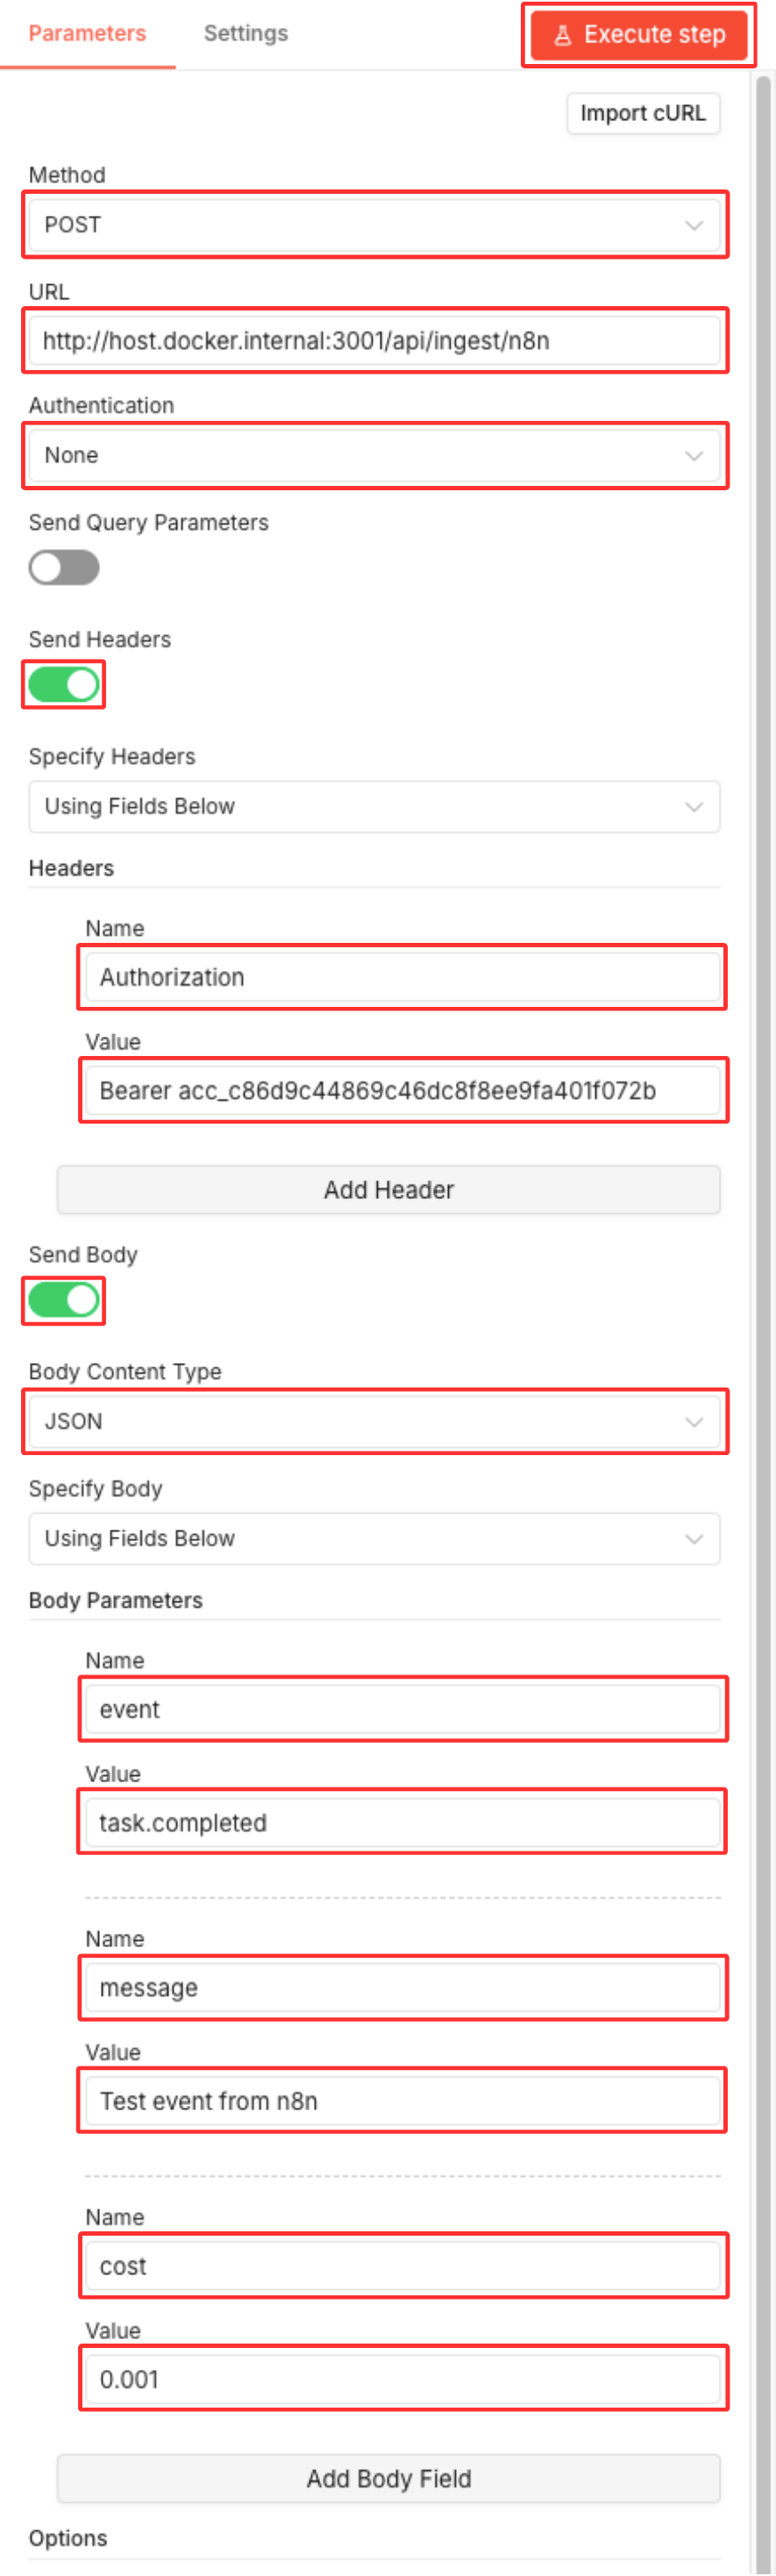
Configure the HTTP Request node
Click the HTTP Request node to open its settings.
1. Method: Set to POST
2. URL: Paste from below
http://localhost:3001/api/ingest/n8n
http://host.docker.internal:3001/api/ingest/n8n
3. Authentication: Leave as None
4. Send Headers: Toggle ON
5. Header Name: Authorization
6. Header Value: Paste the
Bearer acc_... key from your Genten wizard
Add test data
Still in the HTTP Request settings, scroll to Body.
1. Toggle Send Body →
ON
2. Set Body Content Type →
JSON
3. Click Add Body Field three times and enter:
| Name | Value |
|---|---|
event |
task.completed |
message |
Test event from n8n |
cost |
0.001 |
4. Click Execute Step at the top right, then ✕ to close the panel.
Verify the connection
After clicking Execute Step in Step 5, check your Genten wizard. The status should change from "Waiting for event..." to Connected.

The connection status shows "Connected" after your first successful test
Set up two-way chat with AI
OptionalTwo-way chat lets you send messages to your n8n workflow from Genten and get AI-powered replies back.
Create a new workflow
In n8n, create a new workflow — this is separate from the one you built in Steps 3–5.
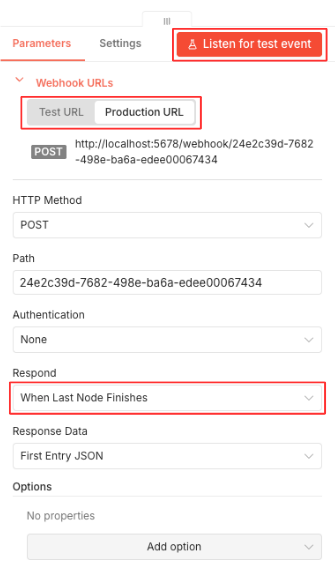
Add Webhook node
Click + in the center, search for
Webhook, and select it
The Webhook node with test URL ready to copy
Connect test webhook to Genten
In the Webhook node, copy the Test URL
Starts with /webhook-test/
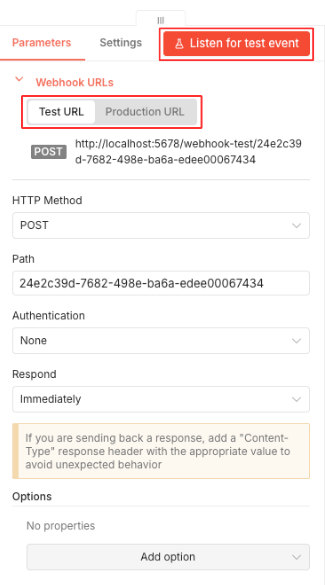
The Webhook node with Test URL and Listen button ready
In Genten, go to your agent's detail page → Configure Webhooks
Paste the test URL into Test Webhook URL and make sure Test Mode is selected
In n8n, click Listen for Test Event
In Genten, click Test Connection — it should turn green
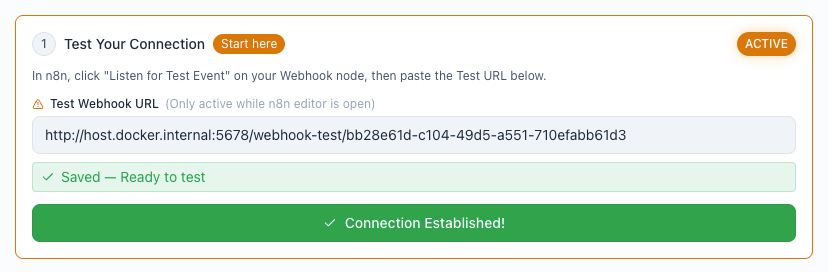
Test connection successful — webhook is listening and Genten confirmed the connection
Configure webhook to respond
In the Webhook node settings, set Respond to
When Last Node Finishes
This makes the webhook wait for the AI response before replying to Genten
Webhook respond setting configured to wait for AI node
Switch to production mode
Copy the Production URL from the Webhook node
(starts with /webhook/)
In Genten, paste it into Production Webhook URL and switch to Production Mode
Verify the connection status shows green in Genten
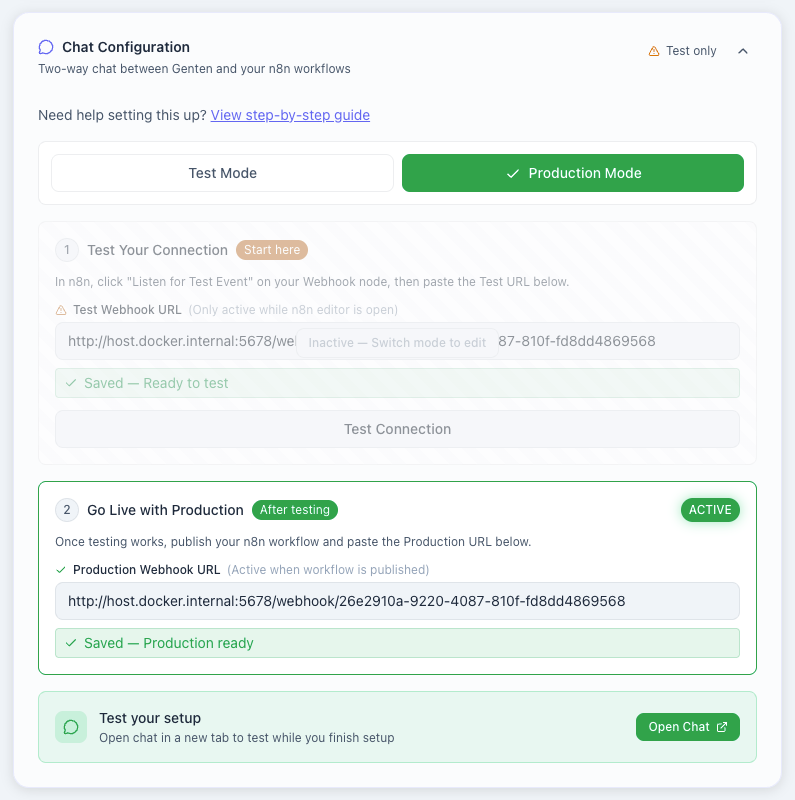
Production webhook configured in Genten with green connection status
WEBHOOK_BASE_URL and
VITE_API_URL environment variables so webhook URLs
resolve correctly. See the
Docker Setup Guide
for details.
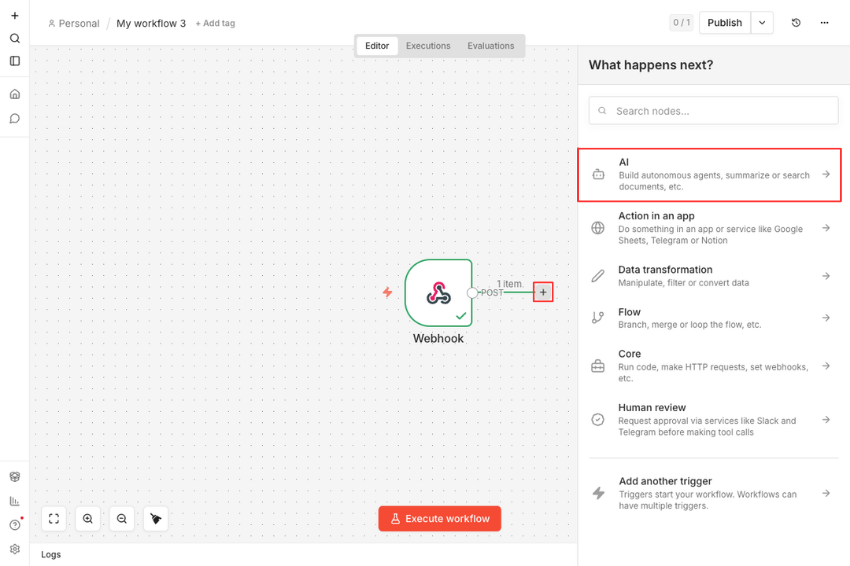
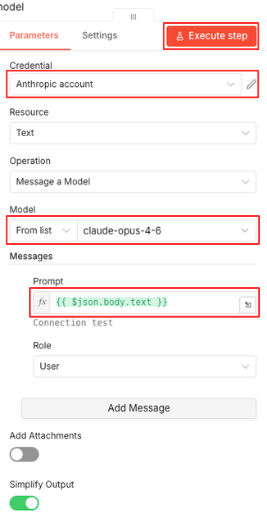
Add AI node
Click + to the right of the Webhook node → search
Anthropic → select
Message a Model
Anthropic AI node connected after webhook node
Configure AI node settings
1. Add your Anthropic API key:
Click Credentials → Create New Credential → Anthropic Account
Paste your API key from console.anthropic.com
Click Save
2. Configure the AI model:
| Setting | Value |
|---|---|
| Model |
Select your preferred model (e.g.
claude-sonnet-4-6)
|
| Prompt | {{ $json.body.text }} |
{{ $json.body.text }} pulls the message text from
Genten's webhook payload and sends it to the AI model.
Test and publish the workflow
Back in n8n, click Execute Step on the AI node to test the full workflow
Both nodes should show green checkmarks
Both nodes showing green — ready to publish
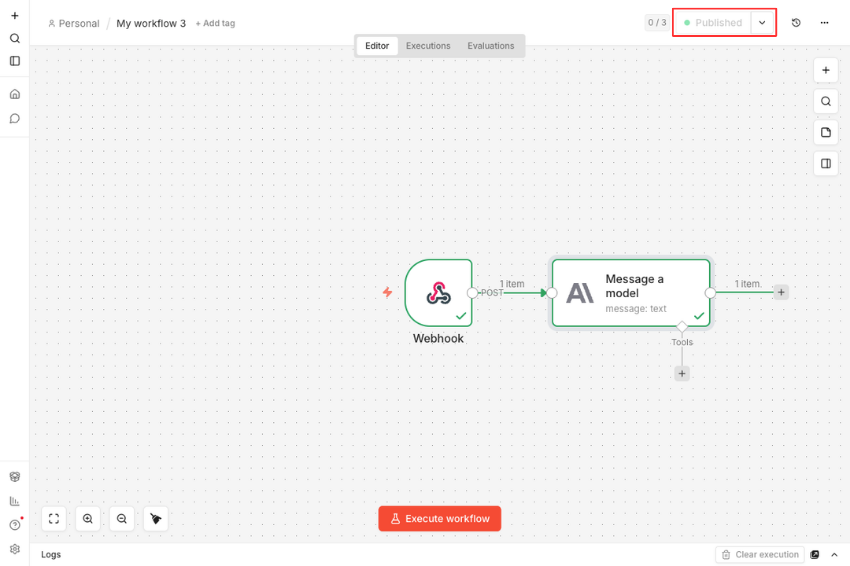
Click Publish in n8n to activate the workflow 24/7
Once published, the n8n editor doesn't need to stay open
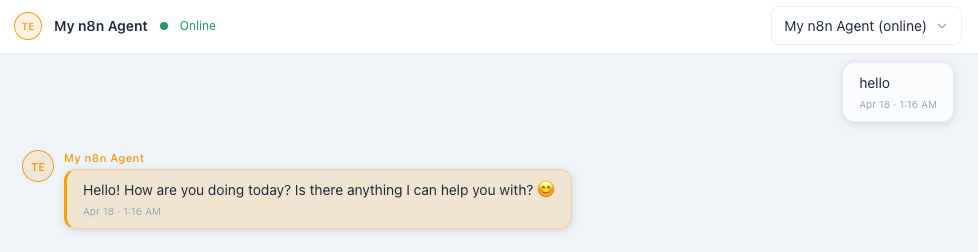
Agent Chat responding via n8n + AI — no editor required
Troubleshooting
| Error | Why it happens | How to fix it |
|---|---|---|
| 401 Unauthorized | API key wrong or missing |
Go back to Step 2, copy the full key, paste as
Bearer YOUR_KEY in the Authorization header
|
| 400 Invalid payload | Request body missing required fields |
Make sure your body has both event and
message fields. cost is optional.
|
| ECONNREFUSED | Genten isn't running, or wrong URL for Docker |
Confirm Genten is running. If using Docker n8n, use
host.docker.internal not localhost in
the URL.
|
| 503 Service Unavailable | Kill switch is active in Genten | Go to Settings in Genten and turn off the kill switch. |
| 500 Internal Server Error | Genten server crashed or DB is locked | Restart Genten. If error persists, check the Docker logs. |
| Event not in Activity Feed | Activity Feed only shows live events | Open Activity Feed before executing your workflow, or refresh after. |
| Changes not saving in n8n | n8n has no visible save button |
Use CMD+S (Mac) or
CTRL+S (Windows/Linux).
|
| Wrong URL for installation method | Using localhost with Docker or vice versa |
npx → use localhost. Docker → use
host.docker.internal.
|
FAQ
Test URL — unique to your n8n instance, only active when you click "Listen for Test Event." Changes when you reopen the editor.
Production URL — stable URL, only active when the workflow is published. Use this in Genten once you've confirmed everything works.
n8n outside Docker → Genten outside Docker: use
localhost:3001
n8n inside Docker → Genten outside Docker: use
host.docker.internal:3001
Both inside the same Docker network: use the service name from
docker-compose.yml
Yes. There's no limit on how many tools share the same API key. Usage counts toward the same rate limits and billing. If you want to track n8n usage separately, create a second key at console.anthropic.com.
No. Genten sends messages to your n8n workflow via a webhook endpoint. Telegram is a separate optional channel for OpenClaw agents — it has nothing to do with the n8n integration.
Three nodes: a Webhook that receives messages from Genten, an AI node (Anthropic or OpenAI) that processes the message and generates a response, and the webhook's built-in response that sends the reply back. Without the AI node you can still send a canned response, but the conversation won't be intelligent.
No. Both npx and Docker work. Docker is recommended if your system Node version isn't 18–24, or if you already use Docker for other tools.
Setup Complete Checklist
http://localhost:5678
event, message,
cost)