OpenClaw Setup

Connect OpenClaw to Genten

A complete walkthrough — from zero to a live, chatting AI agent in your dashboard. Every screen, every prompt, every hiccup covered.

Anthropic API key
Docker installed
~15 minutes
1
Install OpenClaw
One command. Takes about 60 seconds.
⚠️
Before you start: Have your Anthropic API key ready. Get one at console.anthropic.com → Settings → API Keys. You'll paste it during the next step.

Open your terminal and run:

Terminal
npm install -g openclaw@latest

Once it finishes, verify the install worked:

Terminal
openclaw --version

You should see a version number like OpenClaw 2026.4.x. If you see command not found, see PATH fix in Troubleshooting.

That's it for installation. One global package, no Docker, no virtual environments.
2
Run Onboarding
One guided command handles everything — model, key, gateway, channels.
Terminal
openclaw onboard --install-daemon

This replaces the old openclaw setup + openclaw configure flow. Everything happens in one guided session.

ℹ️
The --install-daemon flag installs the gateway as a background service (LaunchAgent on macOS). It starts automatically when you log in — no terminal window needs to stay open.

The onboarding wizard walks you through 11 screens. Here's exactly what to do at each one — nothing to memorize, just follow along.

Type this Expected output Comment / explanation
Screen 1
Security Warning Read, then continue
◇ Security ─────────────────────────────────────────── OpenClaw is a hobby project and still in beta. Expect sharp edges. By default, OpenClaw is a personal agent: one trusted operator boundary. This bot can read files and run actions if tools are enabled. A bad prompt can trick it into doing unsafe things. ... ◇ I understand this is personal-by-default... Continue? ● Yes ← Select Yes
Screen 2
Setup Mode Always choose QuickStart
◇ Setup mode ● QuickStart ← Select this ○ Manual (for advanced users who know OpenClaw well)
Screen 3
Existing Config Detected Only appears on restart
◇ Existing config detected ────────────────── workspace: ~/.openclaw/workspace model: anthropic/claude-sonnet-4-6 gateway.mode: local gateway.port: 18789 ... ◇ Config handling ● Use existing values ← Select this ○ Update values ○ Reset
💡
Fresh install users skip this screen entirely. This screen only appears if you cancelled onboarding and restarted it. On a fresh install you'll jump straight to Screen 4Model / Auth Provider.
Screen 4
Model / Auth Provider Select Anthropic
◇ Model/auth provider ● Anthropic ← Select this ◇ Anthropic auth method ● Anthropic API key ← Select this ◇ Enter Anthropic API key sk-ant-api03-... ← Paste your key here
Screen 5
Default Model Change to Sonnet
◇ Model configured ──────────────────────────── Default model set to anthropic/claude-opus-4-7 (This is just showing you the latest model available) ◇ Default model anthropic/claude-sonnet-4-6 ← Change to this
ℹ️
Opus is capable but expensive. Sonnet gives you 90% of the power at a fraction of the cost. You can always switch individual agents to Opus later if needed.
Screen 6
Channel Status + Selection See Telegram section below
◇ Channel status ───────────────────────────── LINE: needs token + secret Discord: needs token Telegram: needs token ← most users set this up WhatsApp: not linked Slack: needs tokens ... (20+ channels listed) ◇ Select channel (QuickStart) ● Telegram (Bot API) ← recommended if you use Telegram ○ Discord ○ Slack ○ ... (skip any you don't need)

Telegram is the easiest channel to set up — takes 2 minutes and gives you a bot you can chat with from your phone anytime.

1
Open Telegram and search for @BotFather
This is Telegram's official bot for creating and managing bots.
2
If creating a new bot: send /newbot and follow the prompts
BotFather will ask for a name and username, then give you a token that looks like 123456:ABC-abc123...
2
If you already have a bot: send /mybots to BotFather
Select your bot → tap API Token → copy the token shown.
3
Paste the token when OpenClaw asks for it during onboarding
The prompt will say: "Enter Telegram bot token"
What you'll see during onboarding Paste token here
◇ Telegram bot token ──────────────────────────────── 1) Open Telegram and chat with @BotFather 2) Run /newbot (or /mybots for an existing bot) 3) Copy the token (looks like 123456:ABC...) ◇ Enter Telegram bot token 8670653221:AAFBWSlHEKl... ← Paste your token ◇ Telegram already configured. What do you want to do? (only on restart) ● Skip (leave as-is) ← if restarting onboarding
⚠️
DM security note: By default, any Telegram user who finds your bot can send it a pairing request. For private use, restrict it after setup:
openclaw config set channels.telegram.dmPolicy "allowlist"
ℹ️
Where Telegram conversations appear: Messages you send through your Telegram bot go directly to OpenClaw and won't appear in Genten's Agent Chat — that's for chatting with your agent from inside the dashboard. Telegram activity will still show up in your Activity Feed, Audit Log, and Spending.

Coming in an upcoming release: Telegram conversations will sync directly into Genten's Agent Chat, giving you a unified view of all agent activity regardless of which channel it came from.
Screen 7
Web Search Provider Pick a provider or skip
◇ Search provider ○ Brave Search (paid — requires Brave API key) ○ Exa Search (paid) ○ Firecrawl Search (paid) ○ Gemini (free tier — requires Google API key) ○ Grok (xAI) (paid) ○ Kimi (Moonshot) (paid) ○ Ollama Web Search (free — requires local Ollama install) ○ Perplexity Search (paid) ○ SearXNG (free — requires self-hosted instance) ● Tavily Search ← Recommended ○ Skip for now ← fine if you don't have a key ready
ProviderCostWhat you need
Ollama Web SearchFreeOllama installed locally on your machine
GeminiFree tierGoogle Cloud API key
Brave SearchBrave Search API subscription
Perplexity / Exa / GrokRespective API keys
SearXNGFreeSelf-hosted SearXNG instance
⚠️
Avoid Brave if you don't have a key ready. If you select Brave Search, it immediately asks for an API key and won't let you skip. Hit Ctrl+C if this happens and restart onboarding — it'll pick up where it left off.
Screen 8
Skills Skip for now
◇ Skills status ────────────── Eligible: 9 Missing requirements: 43 ◆ Configure skills now? (recommended) ○ Yes ● No ← Select No
💡
Skills extend what your agent can do (file access, browser control, etc.). They're not needed to get Genten working. Add them after you've confirmed everything is running. See Adding Skills below.
Screen 9
Hooks Select 2 hooks
◆ Enable hooks? ◻ Skip for now ◻ 🚀 boot-md ◻ 📎 bootstrap-extra-files 📝 command-logger ← Select (spacebar) 💾 session-memory ← Select this too
Select command-logger and session-memory using spacebar
command-logger feeds activity into Genten's audit log. session-memory keeps your agent's context across conversations. Both are important for Genten to work well.
Screen 10
Gateway Service Install Automatic
◇ Gateway service runtime ──────────────────────────── QuickStart uses Node for the Gateway service (stable + supported). ◇ Gateway service installed. Installed LaunchAgent: ~/Library/LaunchAgents/ai.openclaw.gateway.plist Logs: ~/.openclaw/logs/gateway.log Health check failed: timeout ← Normal, ignore
ℹ️
The "Health check failed: timeout" message on first install is a known quirk. The gateway is actually running — the check just fires before it's fully ready. The Control UI will confirm it's reachable on the next screen.
Screen 11
Hatch Your Bot Do this later
◇ Control UI ───────────────────────────────────────── Web UI: http://127.0.0.1:18789/ Gateway: reachable ← confirms gateway is running ◆ How do you want to hatch your bot? ○ Hatch in TUI (recommended) ○ Open the Web UI ● Do this later ← Select this
💡
You don't need OpenClaw's TUI or Web UI — Genten replaces them. "Do this later" finishes onboarding and leaves the gateway running in the background.

After onboarding completes, run this once to make sure the gateway picks up all your new config:

Terminal
openclaw gateway --force

You'll see output like [gateway] ready (6 plugins: ...) confirming it's live. Leave this terminal open — or close it, the daemon keeps it running regardless.

You're done in the terminal. The gateway runs automatically in the background from here. Open Genten in your browser for the rest.
3
Open Genten
Genten is already running inside Docker — just open your browser.
Browser
http://localhost:3001

You should land on the Genten dashboard. If you see a blank page or connection error, make sure your Docker container is running:

Terminal
# Start Genten if it's not running docker compose up -d
That's all. No Node.js, no npm, no local build. Docker handles everything. Once you see the dashboard, move on to Step 4.
💡
If port 3001 is taken on your machine, see the Port Conflicts section in Troubleshooting for how to remap it in your docker-compose.yml.
4
Connect Your First Agent
The wizard handles the rest. No more terminal.

When you open Genten for the first time, the Connect Agent wizard runs a quick environment check. You'll see three status cards. Here's what the ideal state looks like:

All preflight checks green

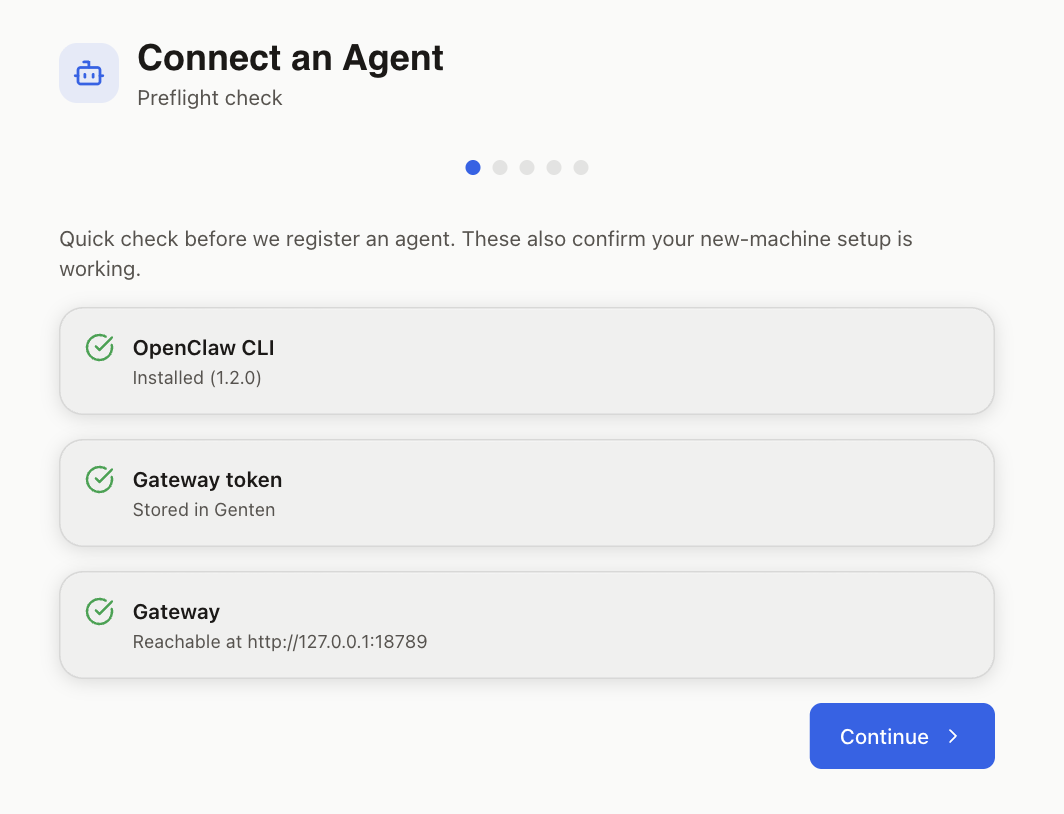
All three green — click Continue to pick your agent type

If any card isn't green, here's what each state means and how to fix it:

OpenClaw CLI — green if openclaw --version works
If red, finish Step 1 and restart Genten.
OpenClaw CLI not detected — red state

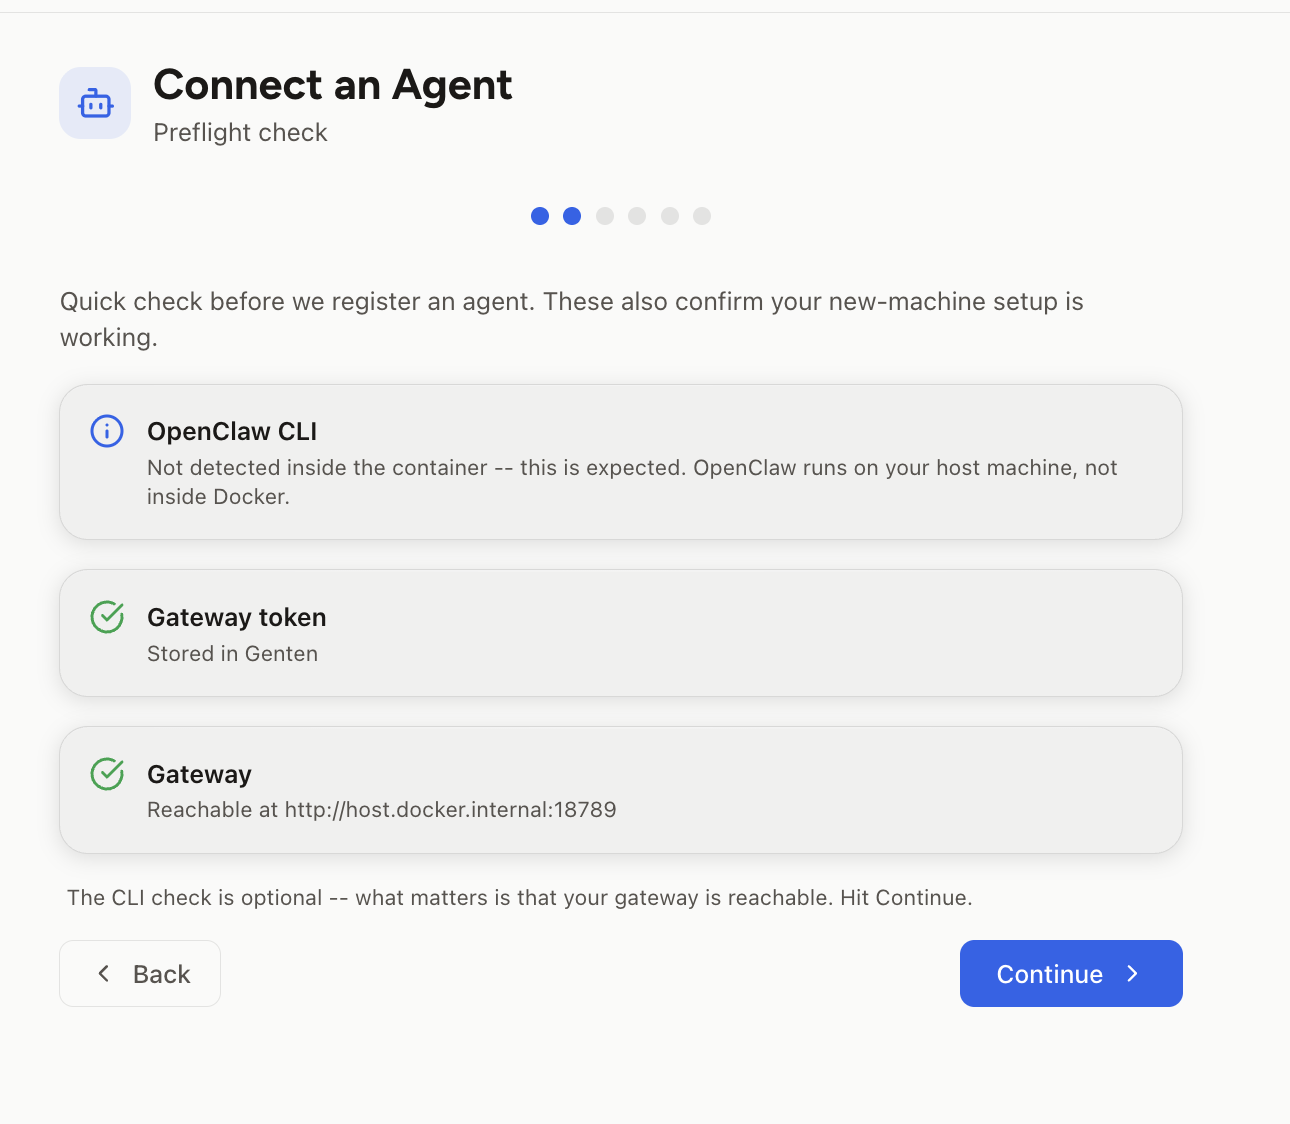
What it looks like when the CLI isn't installed

Gateway token — green if already stored; otherwise you'll enter it next
First-time users will see this as amber — that's normal.
Gateway token amber — not set yet

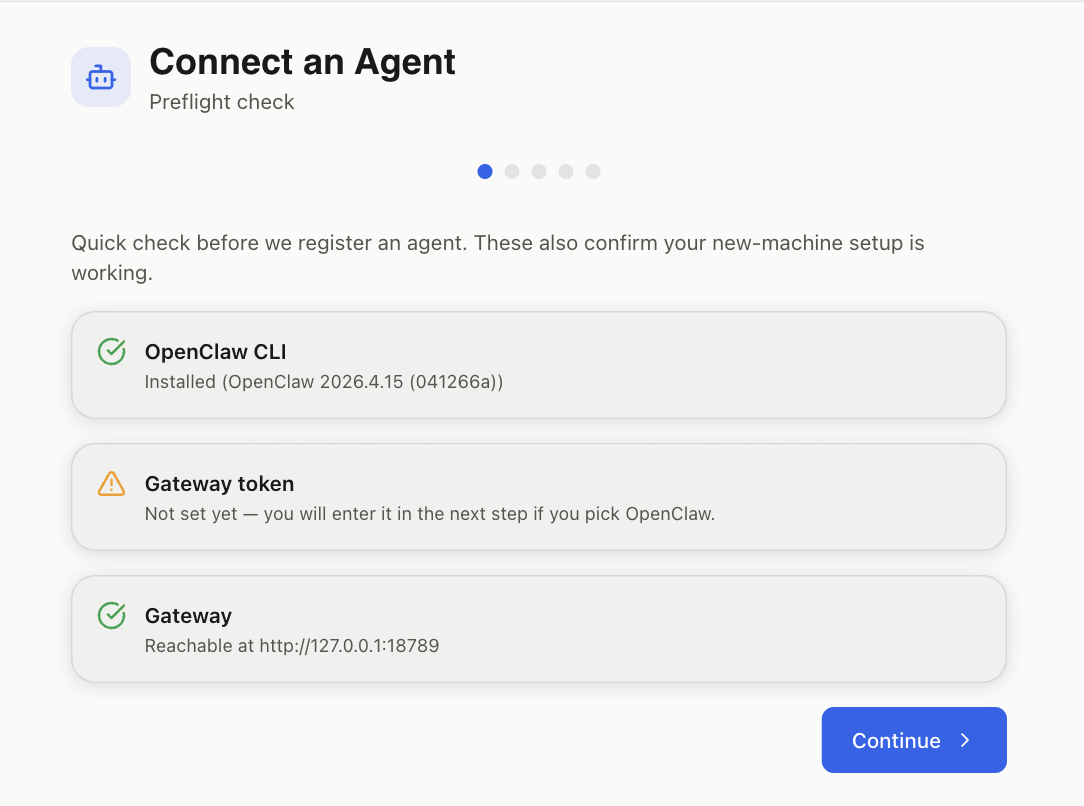
Amber token is normal on your first run

Gateway — green if openclaw gateway is reachable
If amber or red, run openclaw gateway --force in a terminal.
Gateway not running — amber state

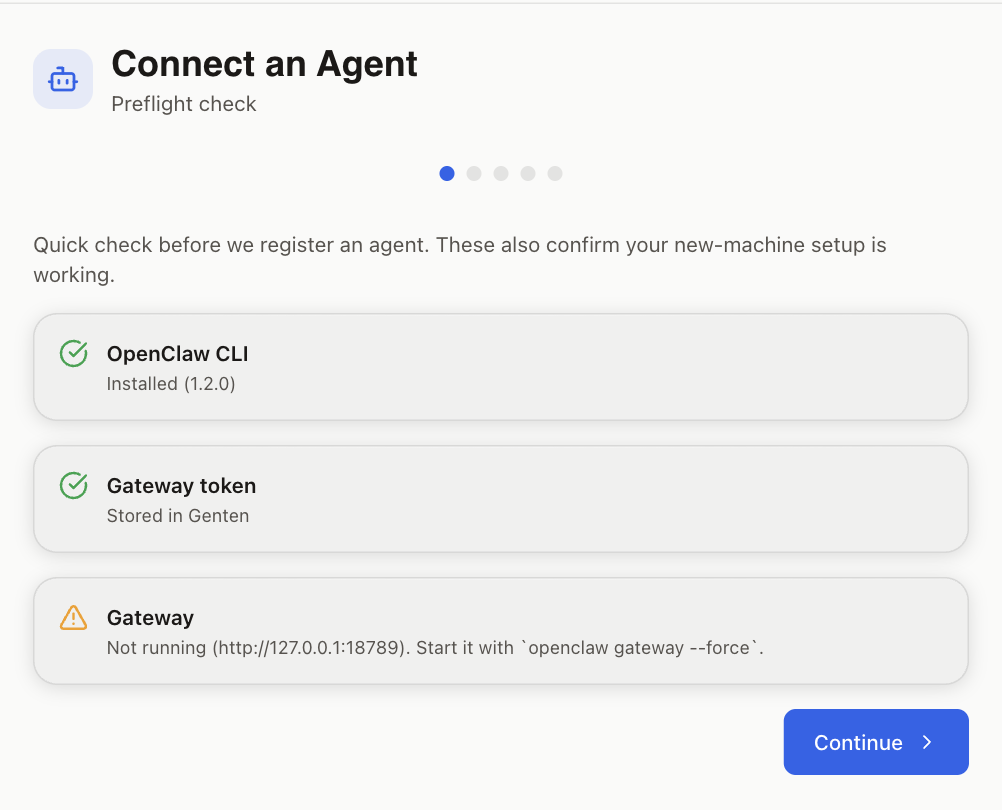
Gateway amber — run openclaw gateway --force

Select OpenClaw from the four framework tiles. It's tagged Popular.

If this is your first time, you'll see a token input screen. Click Detect — Genten reads the token straight out of ~/.openclaw/openclaw.json. No manual digging. Then click Save & Continue.

💡
Once saved, Genten skips this screen on all future agent registrations. You only go through it once per machine.

Give your agent a name, pick a model (claude-sonnet-4-6 is recommended), optionally add a description, and choose an accent color. This color appears on the agent's card, chat bubbles, and everywhere it's referenced in the dashboard.

Click Register My Agent.

The header color tells you what happened:

🟢
"Agent registered!" — Everything worked perfectly. CLI created the workspace, config was written. Nothing else to do.
🟡
"Agent registered with a warning" — CLI wasn't on PATH, but Genten wrote the config directly as a fallback. Your agent is connected and usable. Install the CLI properly to use the preferred path next time.
🔴
"Agent created — manual step required" — Both the CLI call and direct config write failed. The screen shows a JSON snippet — paste it into ~/.openclaw/openclaw.json under agents.list, then restart Genten.

Click Continue to Setup Instructions, then click Send Test Ping. You should see a green "Connected! Your agent is now reporting in." within a few seconds.

💡
The Test Ping actually runs your agent and costs ~$0.001. That's how you know it's a real end-to-end verification, not just a connectivity check.
5
Verify Chat Works
Send your first message and confirm your agent responds.
1
Click Agent Chat in the sidebar
2
Type @ to bring up the agent selector
A list of your registered agents pops up above the input field.
3
Select your agent and send: "Hello, can you hear me?"
Your agent should respond within 10–20 seconds.
🎉
You're live. Your OpenClaw agent is registered, authenticated, and chatting. Every event your agent produces — API calls, tasks, costs — now flows into Genten's dashboard automatically.
Setup Complete Checklist
OpenClaw CLI installed (openclaw --version works)
Onboarding complete (openclaw onboard --install-daemon)
Gateway running (openclaw gateway --force confirmed)
Genten open in browser (http://localhost:3001)
Preflight check passed (CLI green in wizard)
Gateway token detected and stored
Agent registered (any color success screen)
Test Ping succeeded (green confirmation)
Agent responded in Agent Chat
✓ Setup complete — everything below is optional

Level Up Your Setup

Come back to these once your agent is running. None of these are required for Genten to work.

Run the configure command and select the channel you want to add:

Terminal
openclaw configure

From the menu, select Channels, then pick your channel. Your agent picks up new channel connections automatically — no restart needed.

Telegram setup instructions

1
Open Telegram and search for @BotFather
2
New bot: send /newbot · Existing bot: send /mybots
For existing bots: select your bot → API Token → copy it
3
Paste the token when openclaw configure asks for it

Available channels

OpenClaw supports 20+ channels including Discord, Slack, WhatsApp, Signal, iMessage, and more. Run openclaw configure and select Channels to see the full list and their setup requirements.

ℹ️
Where channel conversations appear: Messages sent through Telegram, Discord, or other channels go directly to OpenClaw and won't appear in Genten's Agent Chat. Activity will still show up in your Activity Feed, Audit Log, and Spending.

Coming in an upcoming release: Channel conversations will sync directly into Genten's Agent Chat, giving you a unified view of all agent activity regardless of which channel it came from.

The easiest free option is Tavily — sign up at tavily.com, get a free API key, and add it:

Terminal
openclaw configure --section web

Select Tavily Search and paste your API key when prompted. Your agents pick it up immediately — no restart needed.

Provider comparison

ProviderCostSetup
Ollama Web SearchFreeInstall Ollama first
SearXNGFreeSelf-host a SearXNG instance
Brave / Exa / PerplexityAPI key required

Skills are plugins that extend what your agent can do autonomously — things like reading files, controlling a browser, running terminal commands, or accessing your calendar.

Terminal
openclaw configure

Select Skills from the menu. You'll see a list of skills eligible for your machine (typically 9 on a fresh macOS install). Use spacebar to select the ones you want.

Manage skills anytime

Terminal
# List installed skills openclaw skills list # Enable a specific skill openclaw skills enable <skill-name> # Disable a skill openclaw skills disable <skill-name>
⚠️
Skills give your agent real computer access. Start with only the skills you actually need. Read the docs for each skill before enabling it.
!
Troubleshooting
Real issues from real setups — and how to fix them.
ℹ️
Genten runs inside Docker on your machine. OpenClaw runs directly on your machine (not inside Docker). These two need to talk to each other — most issues below come from that boundary.
ErrorMost Common
Gateway unreachable 502 Bad Gateway on chat Preflight shows gateway red even though openclaw gateway --force is running

Docker containers cannot reach localhost or 127.0.0.1 on the host machine — those addresses point inside the container itself. You need to use host.docker.internal instead.

Add to your .env or docker-compose.yml
# Tell Genten where to find the OpenClaw gateway on your host machine AGENT_GATEWAY_URL=http://host.docker.internal:18789
💡
Linux users: host.docker.internal is not available by default on Linux. Add --add-host=host.docker.internal:host-gateway to your docker run command, or add this to your docker-compose.yml:
extra_hosts: ["host.docker.internal:host-gateway"]
SymptomData Loss
Agents gone after restarting the container Spending history reset Briefings disappeared

By default, Genten's SQLite database lives inside the container and is wiped when the container is removed. You need to mount a volume so the data persists on your machine.

docker-compose.yml
volumes: - ./data:/app/server/data

This mounts a data/ folder next to your docker-compose.yml into the container. Your database, briefings, and agent records survive restarts.

ProblemWhy it happensFix
Gateway unreachable in Genten Gateway isn't running on your host machine Open a terminal on your machine (not inside Docker) and run openclaw gateway --force. Leave it running.
"Gateway already running" error Stale process holding port 18789 launchctl bootout gui/$UID/ai.openclaw.gateway then openclaw gateway --force
Health check failed: timeout (during onboarding) Normal on first install — gateway starts slower than the check fires Ignore it. Run openclaw gateway status to confirm it's actually running.
502 Bad Gateway on chat Genten container can't reach the host gateway. Missing AGENT_GATEWAY_URL env var. Set AGENT_GATEWAY_URL=http://host.docker.internal:18789 in your environment and restart the container.

If you cancel onboarding mid-way and restart it, here's what you'll see:

Screen 3
Restarted onboarding — what to doRecovery flow
◇ Existing config detected ← shows what's already configured workspace: ~/.openclaw/workspace model: anthropic/claude-sonnet-4-6 ◇ Config handling ● Use existing values ← Select this to keep your progress ◇ Telegram already configured. What do you want to do? ● Skip (leave as-is) ← Select this

If you accidentally selected Brave Search and it's asking for an API key you don't have:

Terminal
# Cancel onboarding Ctrl+C # Restart — it picks up where you left off openclaw onboard --install-daemon

On restart, select Use existing values to keep everything you already configured. Then pick Tavily or Skip for now when you get to web search.

ProblemWhyFix
"Agent already exists" Name already in OpenClaw config on your machine Choose a different agent name, or delete the existing one: openclaw agents delete <name>
Test Ping fails Gateway stopped or container can't reach host 1. Confirm gateway is running: openclaw gateway status
2. Confirm AGENT_GATEWAY_URL=http://host.docker.internal:18789 is set
3. Restart the container
Preflight shows CLI red inside Genten OpenClaw CLI is not installed inside the Docker container — it doesn't need to be This is expected. The CLI check looks for OpenClaw on the host via the gateway connection, not inside the container. As long as the gateway row is green, you're fine.
Port 3001 already in use Another process on your machine is using port 3001 Change the port mapping in your docker-compose.yml from 3001:3001 to 3002:3001 (or any free port) and access Genten on the new port.
Can't access Genten in browser Port not exposed in docker-compose Make sure your docker-compose.yml has ports: ["3001:3001", "5173:5173"] under the Genten service.
Feedback button shows error Container has no outbound internet access Ensure Docker is not running in a network-isolated mode. The feedback relay needs outbound HTTPS to reach Google Apps Script.
Daily briefing emails not sending GMAIL_APP_PASSWORD not set in environment Add GMAIL_APP_PASSWORD=your-app-password to your .env or docker-compose.yml environment block.
Agent model shows wrong after registration Stale data from a previous build Delete the agent and re-register it. The polling loop fix is included in this build.